

How To Decorate With Icing
How To Decorate Cookies with Icing: The Simplest, Easiest Method
We independently select these products—if you lot buy from one of our links, we may earn a commission. All prices were accurate at the time of publishing.
If you covet those sleeky, perfectly iced saccharide cookies but don't feel like your pastry skills are quite up to par enough to do information technology yourself, we're here to help. Yous don't need whatsoever special ingredients or equipment. Skip the meringue powder, the pastry numberless, and the piping tips. Embrace your lazy inner baker. This is the simplest, most directly-forward mode to decorate cookies with icing.
The Easiest, Simplest Method for Icing
I am here to tell you that it's entirely possible and perfectly legit to decorate cookies with a simple icing of powdered sugar and milk using squeeze bottles in place of pipage bags. There are some advantages to using the traditional royal icing, which I'll talk nearly below, but for most of us domicile bakers — those of the states who just want some pretty cookies to share with our friends and family — plain ol' sugar icing works only fine.
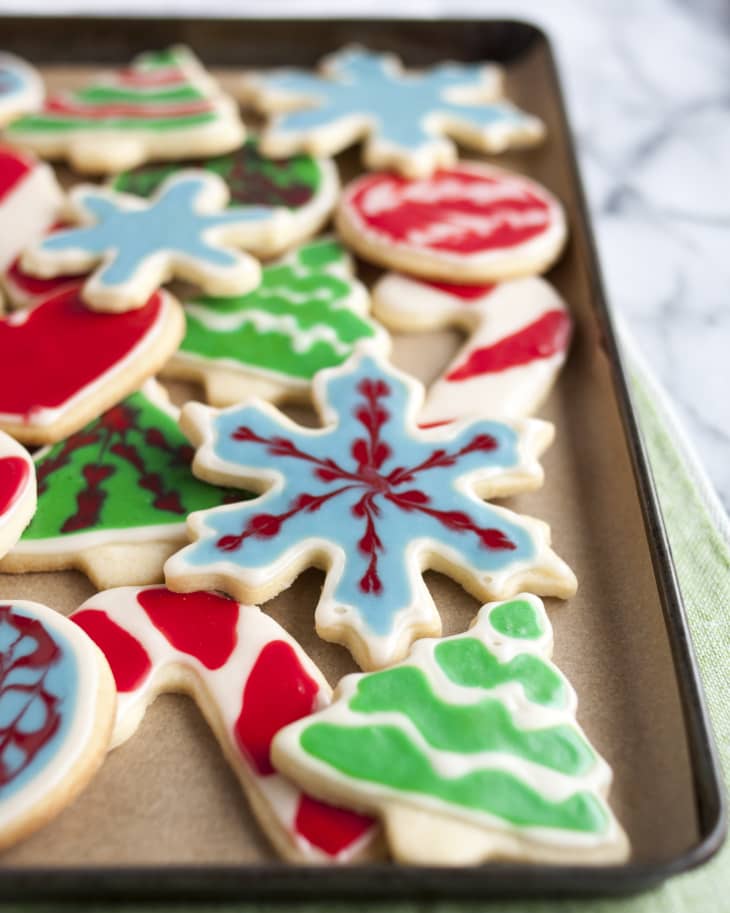
This is a 2-footstep procedure. First yous make a slightly thicker icing, called "edge icing," and use this to trace the outline around your cookie. Then you make a slightly looser icing, called "flood icing," and make full in the expanse in the heart of the cookie. The border icing will work as a bulwark to hold in the more liquidy flood icing, creating a completely smooth layer of icing over the cookie.
Y'all can colour your border and flood icing with food coloring. I like obviously white borders and vibrant centers, just you could colour the border and the flood icing with the aforementioned color or employ contrasting colors. You lot can also describe designs inside the cookies using either the border icing or by dropping a contrasting color of flood icing over the the cookie subsequently you've finished flooding it.
I find that squeeze bottles work merely as well as pipage bags for decorating and are easier for the states not-pro bakers to work with. Plus, they're easy to clean! My favorites are lilliputian 8-ounce squeeze bottles that you lot can find at Michael's and other craft stores. A small funnel makes it piece of cake to fill them. The thicker border icing sometimes needs a little coaxing to get into the bottle — squeezing the bottle creates some suction that volition help pull the icing into the bottle (cheque out the photos in the slideshow).
My favorite squeeze bottles: Wilton Mini Squeeze Bottles from Amazon
What About Royal Icing?
Majestic icing is what professional bakers typically use for this kind of cookie decorating. It'south made with either whipped egg whites or whipped meringue pulverization forth with powdered sugar and water, and it tends to be a little more than stable and thicker than straight powdered sugar icing.
Regal icing is great for fine-detailed decorating work and Martha Stewart, only for the virtually part, I'grand simply not that fancy. I am totally happy with a cookie simply flooded with a layer of crunchy, sugary icing. I as well similar the fact that directly powdered saccharide icing can be made with a fork and bowl in just a few seconds and doesn't require any disclaimers nearly raw eggs when sharing the resulting cookies.
These cookies might not be quite what the pros would go for, merely for friends and family, these fuss-free, homemade, mitt-iced sugar cookies are a credit to the cookie tray.
If you are curious nigh royal icing, here are a few recipes and tutorials about working with it:
The Best Cookies for Decorating with Icing
Thin, flat cut-out cookies like sugar cookies and gingerbread cookies are the all-time candidates for decorating with icing. These cookies are sturdy plenty that they won't crumble as y'all work with them and have big, flat areas that are merely begging for a scrap of decoration.
Make sure your cookies are completely cool before you kickoff decorating or the icing will melt as you decorate. I usually find it easiest to make the cookies on one twenty-four hour period and decorate them the next. Since the decorating itself is fairly time-consuming, I as well sometimes set upwards a cookie-decorating station on my counter and decorate a handful of cookies at a fourth dimension over the course of a 24-hour interval or two.
When retentiveness making, not perfection, is your cookie decorating goal, reach for this easy 2-ingredient cookie icing and these ingenious tips.
- shellfish-free
- low-fatty
- fish-free
- alcohol-gratuitous
- low-potassium
- vegetarian
- peanut-free
- pork-gratuitous
- pescatarian
- tree-nut-free
- red-meat-free
Per serving, based on
4
servings. (% daily value)
- Calories 267
- Fat 1.7 g (2.7%)
- Saturated 0.9 g (four.six%)
- Carbs 63.2 g (21.one%)
- Cobweb
- Sugars 59.eight g
- Protein 0.8 g (1.6%)
- Sodium 23.0 mg (1.0%)
Ingredients
- one batch
sugar cookies, gingerbread cookies, or other cut-out cookies for icing
For the edge icing:
- ane cup
powdered sugar
- 1/2 teaspoon
vanilla or other flavoring extract
- 2 to 2 i/2 tablespoons
milk or water
-
Food coloring (optional)
For the flood icing:
- 1 cup
powdered carbohydrate
- 1/2 teaspoon
vanilla or other flavoring excerpt
- ii 1/two to three tablespoons
milk or water
-
Nutrient coloring (optional)
Equipment
-
Small mixing bowls
-
Mixing utensils
-
Squeeze bottles - 1 for the edge icing and 1 for each color of flood icing
-
Pocket-size funnel
-
Parchment paper
Instructions
-
Articulate some counter space. Iced cookies need at to the lowest degree 24 hours to dry out, so clear a adept amount of counter space or table infinite where y'all tin ice the cookies and leave them undisturbed. Cover the counter with parchment paper.
-
Adjust the cookies for icing. Let fresh-baked cookies cool completely, then arrange all your cookies over the parchment paper. Yous might observe information technology helpful to leave a small-scale workspace clear in front end of yous where you tin movement each cookie every bit you lot're working on information technology.
-
Prepare the border icing. Place the powdered sugar, vanilla, and ii tablespoons of milk or water for the border icing in a medium bowl and stir together with a spoon or a fork until smooth. Information technology should be quite thick, and if you drizzle a footling from your spoon, the ribbon should hold for a few seconds before melting back into the icing. This edge icing should be merely thick enough to cascade easily. If desired, add food coloring to this border icing at present.
-
Transfer the edge icing to a squeeze bottle. Insert a small funnel into the mouth of a squeeze bottle. Spoon some of the border icing into the funnel and let it drip into the bottle. Since this icing is then thick, it can be difficult to go it to drib into the bottle — you tin can squeeze the canteen to suction the icing and start it flowing. If information technology notwithstanding won't commencement flowing, add more than milk or h2o one teaspoon at a fourth dimension until just barely sparse enough to pour (be careful of adding too much or else the edge icing will puddle instead of maintaining a border). Once flowing, it can still take a few minutes for all the icing to funnel into the bottle. Prepare your flood icing while you wait.
-
Prepare the flood icing. Place the powdered sugar, vanilla and 2 1/2 tablespoons of milk or water for the inundation icing in a bowl and stir together with a spoon or a fork until smoothen. This icing should still be fairly thick, but it should drizzle easily and a bit of drizzled icing should sink immediately back into the icing. If desired, add together food coloring to the inundation icing now.
-
Transfer the alluvion icing to a squeeze bottle. Clean and dry out the funnel and insert it into a clean squeeze bottle. Pour the border icing into the bottle; this icing should be thin plenty to funnel hands into the bottle. If necessary, add milk or water 1 tablespoon at a time until a thin, pourable consistency is reached.
-
Gear up every bit many batches of overflowing icing equally needed to decorate your cookies.
-
Draw the borders around the cookies with edge icing. Begin with the border icing and trace the outline of each cookie with icing. Hold the bottle vertical with the tip of the bottle slightly above the cookie. Squeeze gently and with consistent pressure so the border is the aforementioned width all the fashion around. Think of this border icing similar drawing lines with a pen. If desired, you lot can draw inside the cookie — thicker lines are better than thin lines for separating areas of flooded icing.
-
Let border icing to dry slightly. The edge icing doesn't need to be completely dry, but the side by side step (flooding the cookies with icing) works ameliorate if the borders are at to the lowest degree dry to the touch. If you draw the borders on all your cookies earlier moving onto flooding, the first cookies will be dry enough to showtime flooding once you stop drawing the borders.
-
Alluvion the interior of the cookie with flood icing. Using a canteen of the overflowing icing, begin filling the interior of the cookie with icing. Use the nose of the bottle to push the icing into the corners and against edges. Remember of this flood icing similar using a paintbrush.
-
Allow the cookies to dry out. Leave the cookies undisturbed for at to the lowest degree 24 hours to fully dry. Depending on the thickness of your icing and the layers on the cookie, it may accept longer. When the cookies are dry, the surface of the cookies will be completely polish, dry, and resistant to nicks or smudges.
-
Store the dried cookies. Once dry out, y'all can stack the cookies between sheets of parchment newspaper in an airtight container at room temperature for several weeks.
Recipe Notes
Storing icing: The icing will go on for several days in the clasp bottles. It'southward best to shop unused icing in the fridge and let it warm to room temperature before using.
Spreading the piece of work out: Since the icing keeps well, you tin spread your cookie decorating over the class of a day or several days. I often create a station in my kitchen and ice a few cookies at a fourth dimension over a solar day or 2.
Marbleized icing: To brand marbleized icing, flood the entire cookie with icing, and so drop dots or draw a squiggle line over the top with a contrasting color. Run a toothpick through the contrasting icing to "marbleize." For more details, cheque out How To Create a Marbled Issue When Decorating Cookies.
Want More?
Become the Kitchn Daily in your inbox.
Source: https://www.thekitchn.com/how-to-decorate-cookies-with-icing-the-easiest-simplest-method-cooking-lessons-from-the-kitchn-198240
Posted by: collierangst1976.blogspot.com
0 Response to "How To Decorate With Icing"
Post a Comment